| Please note: Images linked to the postage-stamp photos on this page are large. You will have to pan right/left and/or scroll up/down to view the full images. I have done this in order to show the maximum detail possible. |
| Disclaimer: Mountaineering poses significant risks. The route description which follows is not meant to train anyone in climbing techniques. If you fall off the mountain and break your fool neck or any other part of your anatomy, do not send your lawyers, heirs, etc., after me, the Peak Climbing Section, or whomever. You decided the rewards were worth the risks and you accepted those risks when you left the trailhead. |
 |
|
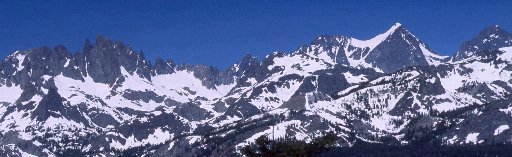
Let's get our bearings with a nice wide shot of the whole Ritter
Range. This one is taken from "Wooley Peak", a hump on the west
side of Mammoth Mountain, and a convenient spot from which to view
the upper part of Mt. Ritter. Starting from the extreme right edge
of the image, we have Banner Peak (12,890'), the Ritter/Banner saddle,
from which the classic John Muir route makes its way up to the summit,
then Mt. Ritter (13,150'), itself. Finally, the right-hand third
of the image shows the Minarets.
We'll come back to a close-up of Mt. Ritter from this same vantage point in a moment. |
| Looking west at a view from above where Shadow Creek exits Ediza Lake, we can get a good idea about the first part of the climb. The major landmark for the lower gully is that dome to the west of Ediza, circled in this view. The gully is just to the right (north) of the dome, and the trick (as Yehuda and I found out the hard way, is to stay in the gully almost all the way to the ridge. Note the pointers to the rocks with the scrubby trees, and then the actual turning-point rocks quite a bit higher up. In this case, we could have turned just below those upper rocks with equal success, but going above them puts you onto even flatter terrain as you meander over the ridge to the bowl. Note that the route goes behind the rocky ridge...you can't see it in this view, but it is a nice easy area once you're up there. |
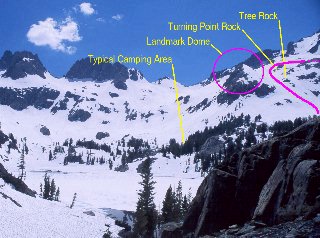 |
| The typical campsite area above Ediza is in that large clump of trees, just above the lake. This year, we camped considerably higher up, and a bit to the east. Depending on whether you are using BRFCs, or making do with a traditional bear-bag hung from a tree, it would take up to a half-hour or so off the climb if you pick a campsite right up at timberline, as close as possible to where the gully intersects the valley through which the outlet stream from the Ritter/Banner glacier makes its way down to Ediza. | |
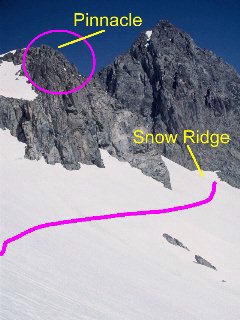
| Once you have gotten to the top of the gully and made your right turn at the upper clump of rocks, you walk over a shallow ridge and are at the south end of this snow bowl. The pinnacle at the southeast corner of the Southeast Glacier is your landmark. It typically has a drifted ridge of snow angling down from it, as it does in this shot. Traverse the bowl, staying basically level with where you started. The only area to consciously avoid is right up next to the rock, where there is a distinct separation between rock and snow. Once you get around to the snow ridge, climb over it and you're on the SE Glacier, proper. |
 |
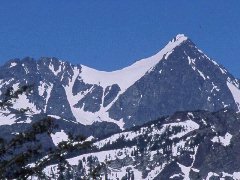
| Our first look at the top part of the climb will again be from the vantage point of Wooley Peak, which gives a good view of the route up from the SE Glacier all the way to the summit. I have shown both a plain and a marked-up version of this shot since the chutes are pretty narrow and tend to be obscured by the route marking. |
 |
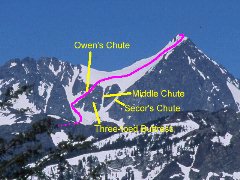 |
The three chutes are clearly visible. From the description in Secor, I infer that he suggests climbing the first, or right-most chute up to the summit bowl. Not having tried this, I cannot give first-hand guidance on its ease or difficulty, but it looked eminently doable from below. Owen Maloy advises that the snow headwall at the transition from chute to upper bowl can be a bit dicey since it gets quite steep due to the winds and drifting. However, others this year have reported that it was not particularly difficult. Caveat emptor! |
|
The middle chute, on the other hand, I have experienced, back
in 1994. When snow-free, it is filled with hand-to-dinner-plate-sized
pieces of loose slate which have an incredibly low coefficient of
friction. I do not recommend this chute, for obvious reasons!
The third chute, marked "Owen's chute", is the widest and most gradual of the three. With a heavy snow season, it was 99% snow-filled, with just a bit of bare scree at the very top...not even enough to be worthwhile taking off crampons to scramble over. The definitive way to this chute is to make sure you stay on the SE Glacier all the way around the "three-toed buttress" (which only has two toes in this year's heavy snow). Once around the buttress, you make a sharp right turn and head up the chute to the upper snow bowl and summit slope. |
|
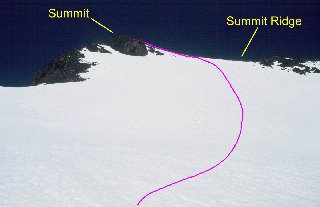
| Having made it up Owen's chute, the view of the summit bowl, summit ridge, and summit is before you. From here, the route is straightforward up to the summit ridge. We actually switchbacked a bit, ending up over near the rocks at the left side of the bowl, before running into thinning snow that had us postholing into the talus below. We made it as high as the second finger of talus sticking out into the bowl on the left-hand side before hitting out turnaround time and heading back down. |
 |
|
The next time, I would try a more direct attach on the upper bowl and
slope, as indicated by my route line in this photo. The slope is not
terribly steep, and the slower straight-uphill pace would be more
than balanced by time not spent switch-backing.
From the ridge to the summit is speculation on my part, having not yet reached that point, but from all reports, once you attain the ridge, the summit is assured. (Famous last words?) |
|
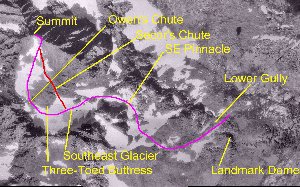
| The annotated image to the right is built up from USGS orthophotoquads downloaded from the Microsoft TerraServer site. It shows the area above Ediza Lake and on up to the summit of Mt. Ritter. The area covered is 2400 meters by 1500 meters. Resolution of the postage-stamp image is approximately 8 meters per pixel. Resolution of the 600 pixel image is approximately 4 meters per pixel. The 950 k-byte full image shows 1 meter per pixel, the maximum resolution of the USGS photo data available for download. |
 |
|
The names given the major landmarks on the annotated map correspond
with names on the slide scans above. They are not correlated
with place names on the topo maps, but are merely my nomenclature
to allow easier descriptions of the route.
In the USGS photos, the stream flowing out of the Ritter/Banner Glacier is readily visible, and the division of the stream where it flows around a bump in its valley is a good landmark for the start of the climb. Looking southwest from that point, you will see the "landmark dome" which marks the south (left) side of the lower gully. As described above, you ascent the gully nearly to the ridge above it, then turn right and contour around the pinnacle at the southeast corner of the Southeast Glacier. From there, you have the choice of the standard Secor route (annotated in red on the aerial photo) or the easier (in my opinion) route up Owen's chute. Once into the upper bowl, attaining the summit ridge is either a snow or talus slog, depending upon the time of year and amount of remaining snow cover. From what we saw, you would want to hit the ridge a bit to the right (east) of the summit and follow the ridge to the summit, proper. I'll have to wait until 1999 to determine that for certain, of course! |
|